Wednesday, 9 April 2014
Monday, 7 April 2014
I learned most photoshop from this website
Step 1: Convert The Background Layer Into A Smart Object
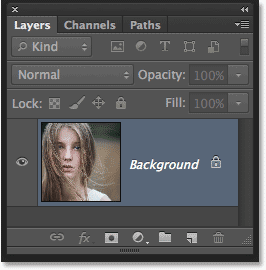
With my photo newly opened in Photoshop, if we look in my Layers panel, we see the image sitting on the Background layer which is currently the only layer in the document:


You can see the current Foreground and Background colors in the color swatches near the bottom of the Tools panel. The Foreground color (upper left swatch) should now be black:


Here, I've painted over the center area of the girl's face to reveal her eyes, nose and mouth through the motion blur effect, and I've also painted along some of her hair:
With my photo newly opened in Photoshop, if we look in my Layers panel, we see the image sitting on the Background layer which is currently the only layer in the document:

The Layers panel showing the photo on the Background layer.
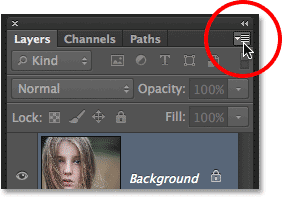
Let’s convert this Background layer into a Smart Object. Click on the small menu icon in the top right corner of the Layers panel:
Clicking the Layers panel menu icon.
Choose Convert to Smart Object from the menu that appears:
Choosing “Convert to Smart Object” from the menu.
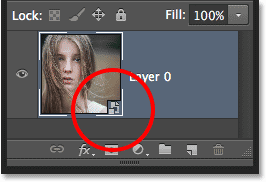
It won’t look like anything has happened to the image, but we can now see a small Smart Object icon in the bottom right corner of the layer’s preview thumbnail in the Layers panel. This is Photoshop’s way of telling us the layer is now a Smart Object:
A Smart Object icon appears in the layer’s preview thumbnail.
Step 2: Apply The Motion Blur Filter
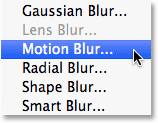
We’ll use a couple of Photoshop’s filters to create the main ghosting effect, and we’ll start with the Motion Blur filter. Go up to the Filter menu in the Menu Bar along the top of Photoshop’s interface, choose Blur, then choose Motion Blur:
Going to Filter > Blur > Motion Blur.
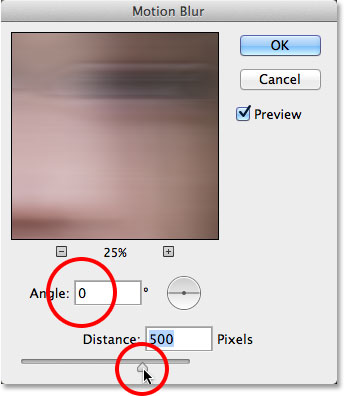
This opens the Motion Blur filter’s dialog box. Start by setting the Angle for the blur to 0°. Then, increase the amount of blurring by dragging the Distance slider along the bottom of the dialog box. The further you drag it to the right, the more motion blur will be applied. The exact amount you use will depend a lot on the size of your image. In the original version of this tutorial, I was using a fairly small photo so I set my Distance value to around 95 pixels. This time, I’m using a much larger image so to achieve the same amount of blurring, I need to set the value much higher (to around 500 pixels). The easiest thing to do is to keep an eye on your image in the document window to judge the results as you drag the slider:
Increasing the motion blur amount by dragging the Distance slider.
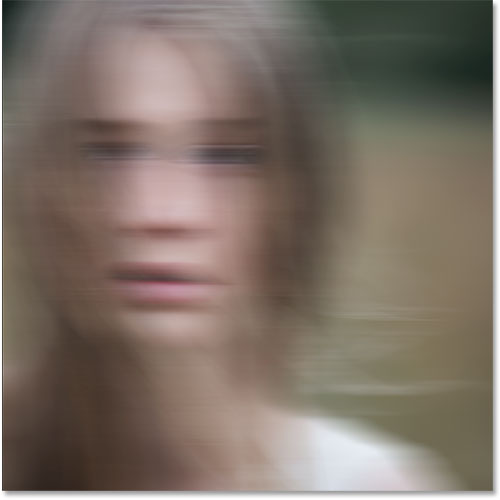
Click OK when you’re done to close out of the Motion Blur dialog box. Your blur effect should look similar to this:
The image after applying the Motion Blur filter.
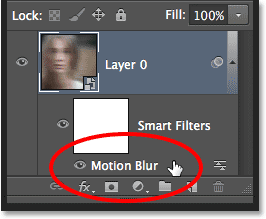
If we look again in the Layers panel, we see that because we first converted the Background layer into a Smart Object, the Motion Blur filter was added as a Smart Filter. If you don’t think you added enough of a blurring effect, or maybe you added too much, just double-click on the Motion Blur filter’s name below the Smart Object to re-open its dialog box and re-adjust the Distance slider. Your changes will be instantly updated in the image (click OK to close out of the dialog box again when you’re done):
Double-click on the Motion Blur Smart Filter to change its settings if needed.
Step 3: Select The Smart Filter Mask
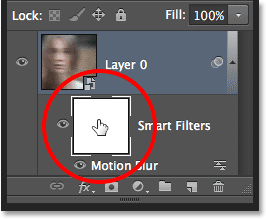
Click on the Smart Filter’s mask thumbnail in the Layers panel to select the mask. A white highlight border will appear around it letting you know it’s selected:
Selecting the Smart Filter mask by clicking on its thumbnail.
Step 4: Select The Brush Tool
We’re going to use the mask to bring back some of the original non-blurred areas of the image. Select Photoshop’s Brush Tool from the Tools panel along the left of the screen (or press the letter B on your keyboard to select the Brush Tool with the shortcut):
Grabbing the Brush Tool.
Step 5: Set The Brush Color To Black
We’ll need to paint on the mask with black to reveal some of the original photo, which means we first need to set our brush color to black. Photoshop uses the current Foreground color as the brush color, so with the mask selected in the Layers panel, press the letter D on your keyboard. This will reset the Foreground and Background colors to their defaults, with white as the Foreground color and black as the Background color. Then, press the letter X on your keyboard to swap them, which sets the Foreground color to black.You can see the current Foreground and Background colors in the color swatches near the bottom of the Tools panel. The Foreground color (upper left swatch) should now be black:

The current Foreground (upper left) and Background (lower right) colors.
Step 6: Lower The Brush Opacity To 25%
With the Brush Tool selected, go up to the Options Bar along the top of the screen and lower the Opacity value to 25%. This will allow us to reveal the original image gradually with each brush stroke, making it easier to fine-tune the amount of blurring in a certain area (rather than the “all or nothing” approach we’d get by painting with a brush opacity of 100%):
Lowering the brush opacity to 25% in the Options Bar.
Step 7: Select A Round, Soft-Edge Brush
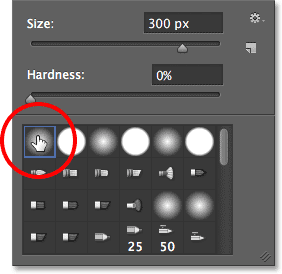
Right-click (Win) / Control-click (Mac) anywhere inside the image to open the Brush Preset picker and choose a round, soft-edge brush from the list. I’ll choose the very first one in the top left corner by clicking on its icon. This gives us a brush with a Hardness value of 0%, or in other words, the softest edge possible. Press Enter (Win) / Return (Mac) when you’re done to close out of the dialog box:
Choosing a round, soft-edge brush.
Step 8: Paint Over Areas To Reveal The Original Photo
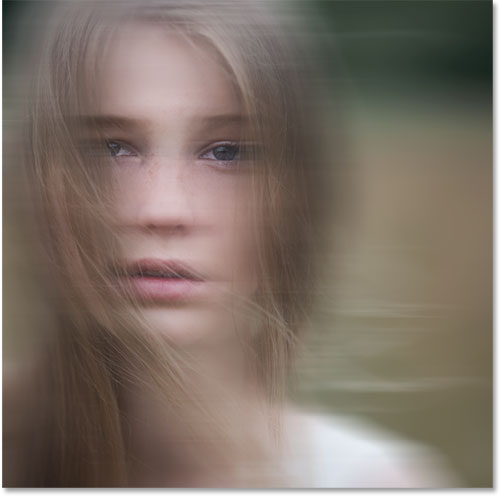
With the Brush Tool in hand, black as your Foreground color and the brush opacity lowered to 25%, begin painting over areas where you want to reveal the original image through the motion blur effect, like the person’s eyes, nose and mouth. Each time you paint a brush stroke over the same area, you’ll reveal a bit more of the original image (make sure to release your mouse button in between brush strokes). You can adjust the size of your brush directly from your keyboard. Press the right bracket key ( ] ) repeatedly to make the brush larger or the left bracket key ( [ ) to make it smaller. If you accidentally paint over the wrong area, or you've revealed too much of the original image in a certain area, press the letter X on your keyboard to swap the Foreground and Background colors, which will set your Foreground color to white. Paint over the area with white to bring back the motion blur effect, then press X again to set your Foreground color back to black and continue painting.Here, I've painted over the center area of the girl's face to reveal her eyes, nose and mouth through the motion blur effect, and I've also painted along some of her hair:

The image after painting with black on the Smart Filter mask.
very useful to read thorugh this.. helping you understand more!
Some are very basic while others go a little deeper – but all have been selected from our archives specifically for beginners and new camera owners. Enjoy.
Introductions to Useful Modes and Settings on Your Digital Camera
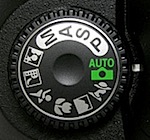 1. Digital Camera Modes Explained – I spoke with a family friend recently who had just bought a new point and shoot camera. She came up to me with her camera when no one was watching and embarrassedly asked me if I could tell her what all the little icons on the dial on top of her camera meant. This article explains what each of these most common digital camera modes means and does. Knowing them can take your shots to the next level.
2. Aperture and Shutter Priority Mode – this introduction talks you through these two very useful settings that can be found on many digital cameras. Aperture and Shutter Priority modes take you out of Automatic mode giving you more control over your images – but don’t thrust you fully into manual mode – they are great settings to explore and master.
3. Introduction to White Balance – one of the most common problems that I see in beginner photographer images are shots with incorrect color. We’ve all seen them – portraits where your subjects teeth and eyeballs (and everything else) has a yellowish tinge. Learn what causes this and how to combat it with this tutorial on White Balance.
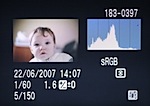 4. Understanding Histograms – ‘histograms are scary’ – this is what one reader said to me recently when they discovered that they could view these little graphs or charts on their camera. While they might seem a little technical it is amazing how simple a histogram is to interpret. Know what you’re looking for and with just a glance you’ll know if your image is under or over exposed. It’s a useful tool to master.
5. Automatic Exposure Bracketing (AEB) – this feature is another of those often unexplored settings that many cameras have built into them that will allow you to get well exposed shots in even the trickiest of lighting situations.
Other Basic Camera Techniques

6. How to Hold a Digital Camera – this beginner tutorial covers a topic that most camera owners skip over without realizing that it is a foundational lesson in photography. Get this wrong and it can impact the quality of your shots.
7. Shutter Release Technique – another ‘basic’ or ‘beginner’ type tip that many do intuitively – but which can drastically improve your photography if you don’t do it.
8. How to Use Focal Lock – yet another beginner technique that many of us take for granted yet which is at the core of how all digital cameras focus automatically. Get this wrong and you’ll take a lot of shots of out of focus subjects and in focus backgrounds!
9. How to Take Sharp Digital Images – ‘my shots are fuzzy’ – it’s a common problem that we’re asked about at DPS so we wrote this tutorial to refer people to to help them get the sharpest images that their camera can take.
 10. Shooting with an In Camera Flash – flash photography with an in built flash can lead to some terribly blown out images – here are a few tips on how to avoid them. On a similar topic – here’s 7 Strategies for Avoiding Flash Blow Out.
11. How to Get Shallow Depth of Field in Your Digital Photos – a great technique to learn if you’re into many types of photography (portraits, macro etc) is how to control the depth of field in your shots and make your main subject ‘pop’ out by making your background nicely blurred – this tutorial talks you through how to do it.
12. Understanding Exposure – this post talks new camera owners through the three main elements of Exposure. Once you’ve read it also check out our introductions to ISO, Aperture and Shutter Speed.
Camera Care and Maintenance
 13. How to Avoid a Dirty DSLR Sensor – one of the fastest ways to ruin every single shot you take with your new DSLR is to end up with a dirty image sensor. This tutorial gives some basic tips on how to ensure it stays as clean as possible.
14. How to Clean a DSLR Lens – as much as you try to protect them – lenses tend to get a little grimy over time. This tutorial shares some basic tips on how to clean them up so that your shots will be as clear as possible.
15. 7 Digital Camera Predators and How to Keep them at Bay – this tutorial talks you through 7 of the most common ways that digital cameras get damaged – what to look out for and what preventative action to take to avoid them.
Composition Tips
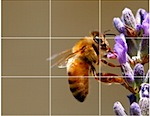 16. The Rule of Thirds – whether you know it to follow it or break it – it’s something you should at least know about.
17. Points of Interest – an image without some visual point of interest in it is unlikely to hold the eye of anyone viewing it.
18. Getting Horizons Horizontal – the perfect way to ruin that lovely sunset or landscape shot is to make it lean to one side. Get your Horizon Horizontal!
19. Fill Your Frame – this is not applicable to every shot you take but many photographers could drastically improve their photography by getting in close to their subject and filling their frame.
 20. Getting Backgrounds Right – the background of your shot can make or break your image. This tutorial talks you through a number of things to look out for and techniques to use to get them just right.
21. Adding Randomness to Your Photos – learn how to set your images apart from everyone else’s by injecting creativity, variety and a little randomness into your shots.
Of course the above 21 Settings, Techniques and Rules for beginner camera owners just scratch the surface of all there is to learn about the art of photography. Subscribe to our blog here (via email or RSS) to get more free daily tips to help you keep improving and learning.
https://www.blogger.com/blogger.g?blogID=3829969151464794163#editor/target=post;postID=9127238363649998433
Introductions to Useful Modes and Settings on Your Digital Camera
 1. Digital Camera Modes Explained – I spoke with a family friend recently who had just bought a new point and shoot camera. She came up to me with her camera when no one was watching and embarrassedly asked me if I could tell her what all the little icons on the dial on top of her camera meant. This article explains what each of these most common digital camera modes means and does. Knowing them can take your shots to the next level.
2. Aperture and Shutter Priority Mode – this introduction talks you through these two very useful settings that can be found on many digital cameras. Aperture and Shutter Priority modes take you out of Automatic mode giving you more control over your images – but don’t thrust you fully into manual mode – they are great settings to explore and master.
3. Introduction to White Balance – one of the most common problems that I see in beginner photographer images are shots with incorrect color. We’ve all seen them – portraits where your subjects teeth and eyeballs (and everything else) has a yellowish tinge. Learn what causes this and how to combat it with this tutorial on White Balance.
 4. Understanding Histograms – ‘histograms are scary’ – this is what one reader said to me recently when they discovered that they could view these little graphs or charts on their camera. While they might seem a little technical it is amazing how simple a histogram is to interpret. Know what you’re looking for and with just a glance you’ll know if your image is under or over exposed. It’s a useful tool to master.
5. Automatic Exposure Bracketing (AEB) – this feature is another of those often unexplored settings that many cameras have built into them that will allow you to get well exposed shots in even the trickiest of lighting situations.
Other Basic Camera Techniques

6. How to Hold a Digital Camera – this beginner tutorial covers a topic that most camera owners skip over without realizing that it is a foundational lesson in photography. Get this wrong and it can impact the quality of your shots.
7. Shutter Release Technique – another ‘basic’ or ‘beginner’ type tip that many do intuitively – but which can drastically improve your photography if you don’t do it.
8. How to Use Focal Lock – yet another beginner technique that many of us take for granted yet which is at the core of how all digital cameras focus automatically. Get this wrong and you’ll take a lot of shots of out of focus subjects and in focus backgrounds!
9. How to Take Sharp Digital Images – ‘my shots are fuzzy’ – it’s a common problem that we’re asked about at DPS so we wrote this tutorial to refer people to to help them get the sharpest images that their camera can take.
 10. Shooting with an In Camera Flash – flash photography with an in built flash can lead to some terribly blown out images – here are a few tips on how to avoid them. On a similar topic – here’s 7 Strategies for Avoiding Flash Blow Out.
11. How to Get Shallow Depth of Field in Your Digital Photos – a great technique to learn if you’re into many types of photography (portraits, macro etc) is how to control the depth of field in your shots and make your main subject ‘pop’ out by making your background nicely blurred – this tutorial talks you through how to do it.
12. Understanding Exposure – this post talks new camera owners through the three main elements of Exposure. Once you’ve read it also check out our introductions to ISO, Aperture and Shutter Speed.
Camera Care and Maintenance
 13. How to Avoid a Dirty DSLR Sensor – one of the fastest ways to ruin every single shot you take with your new DSLR is to end up with a dirty image sensor. This tutorial gives some basic tips on how to ensure it stays as clean as possible.
14. How to Clean a DSLR Lens – as much as you try to protect them – lenses tend to get a little grimy over time. This tutorial shares some basic tips on how to clean them up so that your shots will be as clear as possible.
15. 7 Digital Camera Predators and How to Keep them at Bay – this tutorial talks you through 7 of the most common ways that digital cameras get damaged – what to look out for and what preventative action to take to avoid them.
Composition Tips
 16. The Rule of Thirds – whether you know it to follow it or break it – it’s something you should at least know about.
17. Points of Interest – an image without some visual point of interest in it is unlikely to hold the eye of anyone viewing it.
18. Getting Horizons Horizontal – the perfect way to ruin that lovely sunset or landscape shot is to make it lean to one side. Get your Horizon Horizontal!
19. Fill Your Frame – this is not applicable to every shot you take but many photographers could drastically improve their photography by getting in close to their subject and filling their frame.
 20. Getting Backgrounds Right – the background of your shot can make or break your image. This tutorial talks you through a number of things to look out for and techniques to use to get them just right.
21. Adding Randomness to Your Photos – learn how to set your images apart from everyone else’s by injecting creativity, variety and a little randomness into your shots.
Of course the above 21 Settings, Techniques and Rules for beginner camera owners just scratch the surface of all there is to learn about the art of photography. Subscribe to our blog here (via email or RSS) to get more free daily tips to help you keep improving and learning.
https://www.blogger.com/blogger.g?blogID=3829969151464794163#editor/target=post;postID=9127238363649998433
NEW PROJECT! PHOTOGRAHPY AND LENS BEASED MEDIA
This lady made a series of her baby!
Have a look!

And another one
from different maker
have a look
simple but its giving some ideas
Friday, 4 April 2014
Tuesday, 1 April 2014
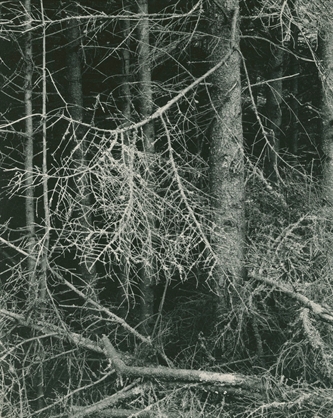
Didn't work out! AND some of Paul Strand's work I looked at!
So I did 400 and 125 film
unfortunately none of them
work out for me!
This time I did the same again
Using 400 and 125
I took images around college
and The Park cross the road from college
and few photos of the roads .
This time I hope they'll work out
very well!
PAUL STRRAND
Subscribe to:
Comments (Atom)
.jpg)


